We have written some activities for you to use on world ocean day.We hope you enjoy them. There are some for the classroom, so that can be completed in the classroom or at home and some to do on the beach. Please do email us at hello@timeandtidebell.org with any pictures you are happy to share, or feedback!
To use the PDF, just click on the picture below to download it and then click on the links for more detail about/instructions to complete the activities.
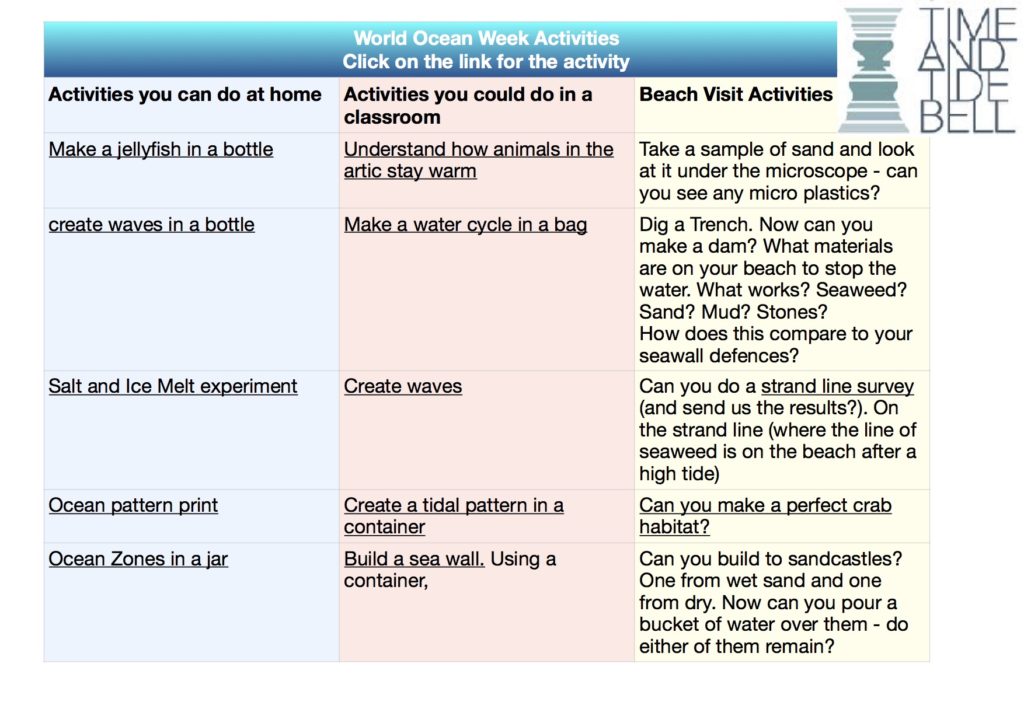
Enjoy!
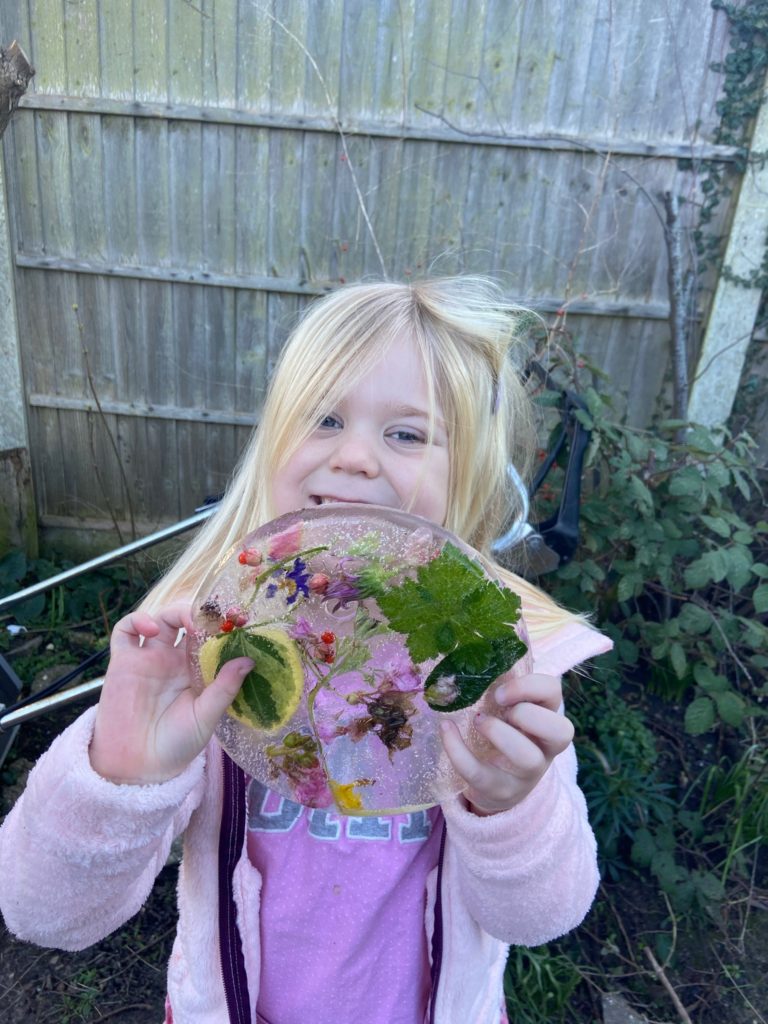
Its very very cold and very very snowy here in lockdown 3, Essex! So we thought we might set a new activity up, given that the weather forecast says its cold everywhere else too! Ice sun catchers!
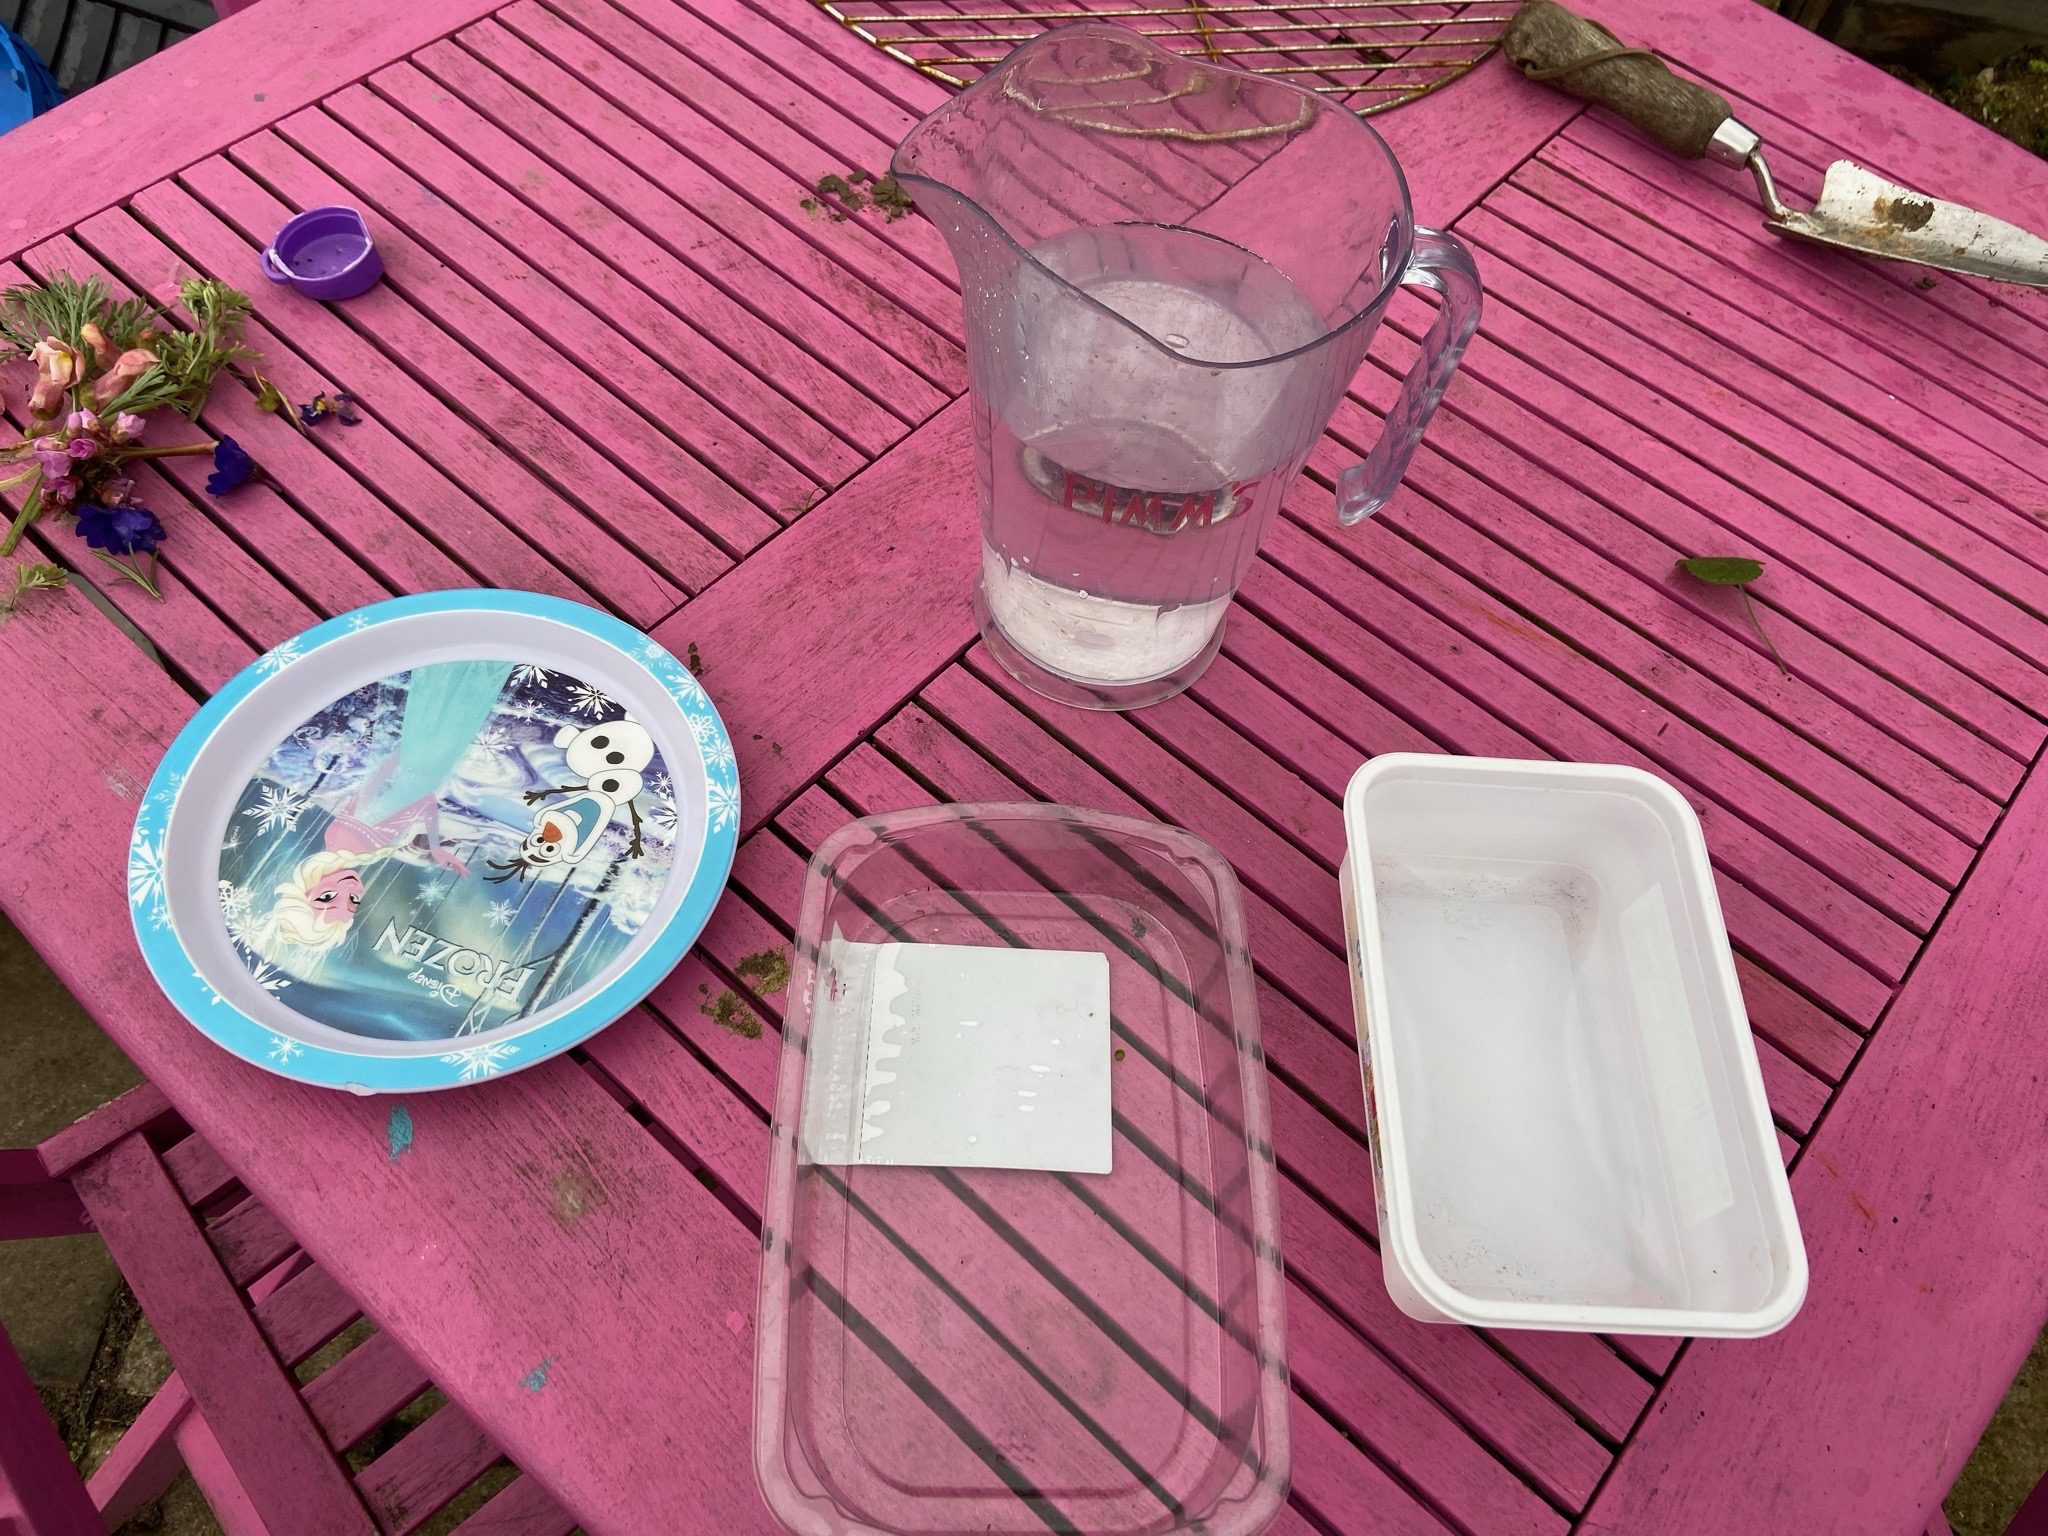
You will need: a container or plate, a jug to pour water, some leaves/berries/twigs/winter flowers from the garden or your walks. A piece of string, about 10cm long.
Pour a thin layer of water (no deeper than 2 cm) into the container. Place the berries/twigs/leaves in the water in any pattern you want. Pop the string into a hoop and place either end into the water (at least 2cm in the water for each end). Now, just leave the container outside (if its cold enough! If not, pop it into the freezer!)
Over night it should freeze. In the morning, take it out and you have a beautiful ice sun catcher you can hang in your tree!
Essex wildlife trust have some amazing activities that are just fab for the end of the holidays. If you have been to the beach at all, we really recommend that you visit their page and have a look.
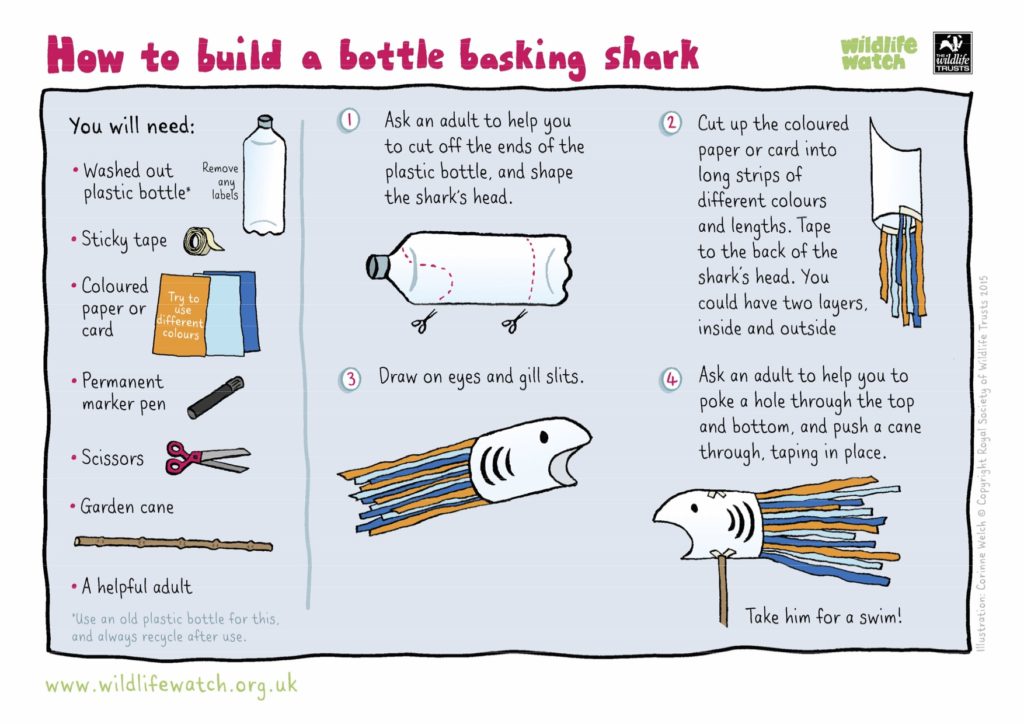
One of our favourites is this bottle basking shark but you can also go rock pooling, head on a beach clean (make sure you wear gloves!), plan some eco crabbing and try out some of these ideas to keep the sea healthy (can be done away from the sea). We hope you enjoy them as much as we have!
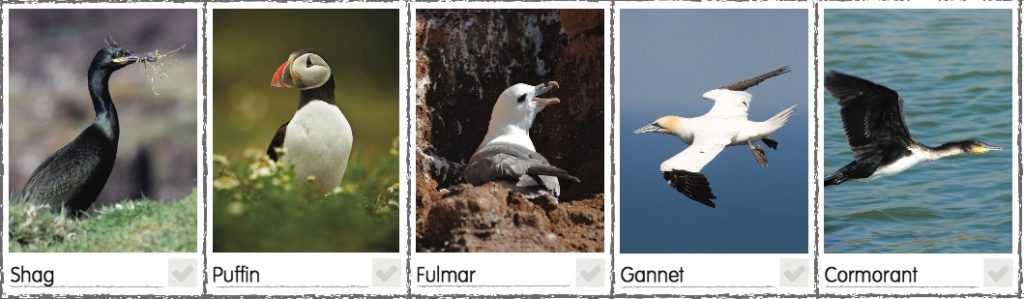
The Wildlife Trusts have a fantastic spotter chart available to use for marine month. You can see which birds are in your local costal area... a lovely way to pass some time but if you want it to be really useful, you can log your spots on iNaturalist for some local cities science and/or sea bird tracking projects.
You can download the spotting chart here.
You can find iNaturalist here (or if you're on a phone, download it from the app store).
Lots more beach focus today for those who live near our bells/on the beach/are on beach holidays.... Maths is important, and revisiting each day for 10 minutes is really helpful for children. But it doesn't have to be a dreary textbook.... physical maths is vital for young and old children to remember simple and more complex skills. Todays activity requires some shells (stones work just as well though).... simple!
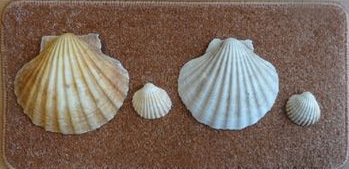
Start by creating a simple repeating pattern and asking your child to finish the pattern off. If the child is very young, you might want to draw around the shells in the sand (if its sandy!) to finish the pattern then pop them to one side for the child to select. You can repeat this as many times as it is needed, with different shells or different patterns.
Once they have done this, ask them to make one for you and see if you can complete it. If your child is older, try and see if they can catch you out by making a more complicated repeating pattern! You can do the same for them and then swap patterns to finish. We often have a competition to see if we can make 5 different repeating patterns...
Finally, you can play about with shapes and make some lovely pictures with shells or play by making shell or stone 2D and 3D shapes - there is a post here to help with that! Enjoy!
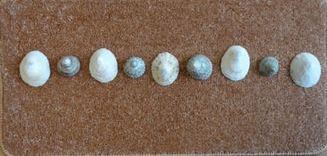
Good morning. As lots of people are heading to beaches around the UK, we thought a Shell Identification chart was on the cards. So here it is - written by the Marine Biological Association in Plymouth, its relevant for all UK beaches (and mudflats) and its great fun finding the names for all the shells you see.
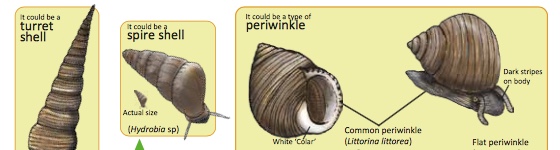
If you want to take it one step further, you can download the inaturalist app and log your finds on there for all the projects we have in the UK (and Europe!). My children love doing this!
Have fun shell hunting!
This was a great little activity - there was some working through frustration, but we all worked as a team and learned a lot in the process. Depending on your nature collection, knot tying and finances, you may want to vary the materials...
You will need: plenty of string, a longish straights stick, somewhere to hang the stick, some items to hang (we had some birds nests we made to put things in, but you could easily use small buckets or flowerpots), a ruler.
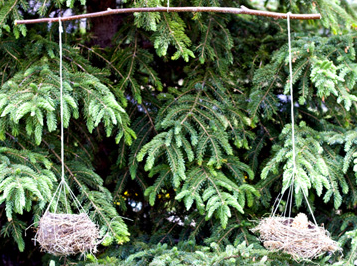
We started with the stick. We hunted for a while to collect a stick that was as straight as we could make it. We carefully measured, the stick and found the middle. Now, we tied a piece of string around it - we wrapped the string around twice, then tied the ends together at the top (making one big hoop). We then hung the stick to make sure it balanced - this required a bit of shuffling the string to make sure the stick was in a straight line.
Next, we found something to hang - my oldest used the home made birds nests (like in the picture above) but my 4 year old tied on flowerpots as that was easier. We tied two hoops around the object (so there were 4 pieces of string coming up from the bottom, then tied them together at the top with 1 piece of string. After all this knot tying we were experts! If you are not confident at tying knots, there is a video, here, that you can follow.
Finally, we tied them onto each end of the string and, again, shuffled them about so they could hang evenly. We learned loads about balance and discussed how hard it is to make things balance during this time. My 6 year old had to walk away and have a little drink pause a few times to help manage the frustration. During this pause, we collected things we wanted to measure.
Finally, our balance scale was ready and we could weigh our things! We compared the weight of pine cones, two spades, sand and mud (in the flower pots!), leaves... anything the children could collect. They had a lovely afternoon testing their hypothesis... I hope you have as much fun!
This is great fun! Building on our sweetie structures yesterday, we are going to build a marshmallow catapult! It gets the brain moving and is great for small and big kids!
You will need: Jumbo Marshmallows (around 4), Mini Marshmallows (these will be your launchers), Wooden Skewers or cocktail sticks (7), Lightweight spoon (we used a disposable bamboo one, but plastic would do), rubber bands, tape.
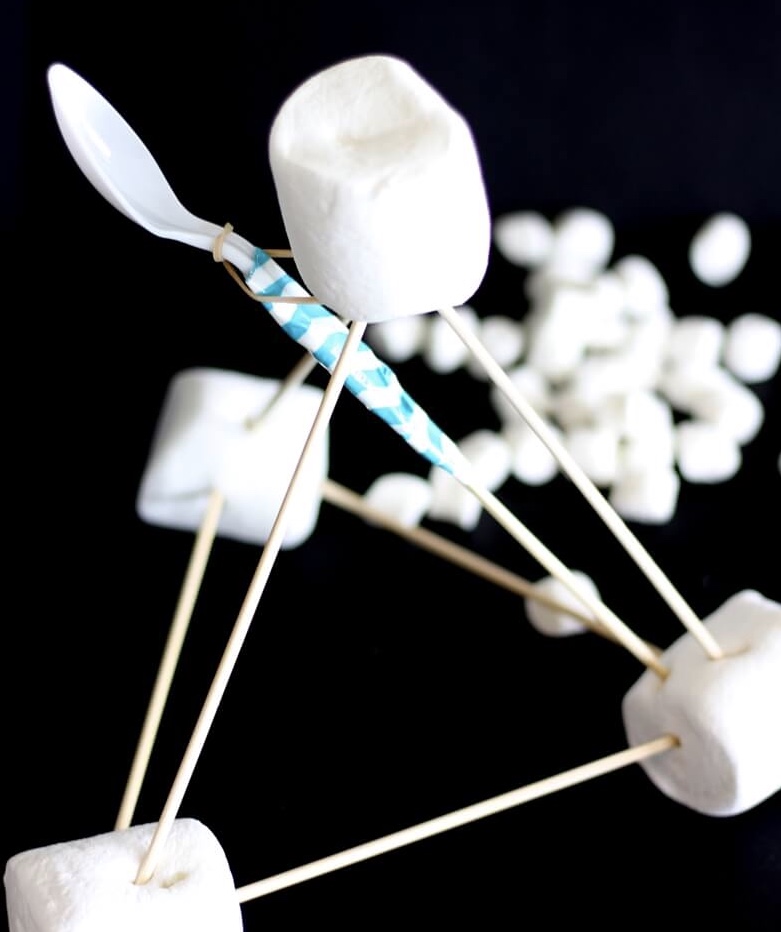
Place three marshmallows in a triangle shape on a table. Connect, by sticking with cocktail sticks into them. Your triangle should lay on the table. Now, take a cocktail stick and stick it into the top of each marshmallow. Bring the tops of the cocktail sticks together in the middle and push all of them into one marshmallow. (To make a 3D shape - a triangular pyramid). Tape a spoon to another cocktail stick. Stick this stick into one of the marshmallows below the skewer already in place. Take the rubber band and wind around spoon and then loop end of rubber band around marshmallow and bringing it underneath the marshmallow (so it presses on the cocktail stick, not the marshmallow).
Now, play! If you enjoyed this, there is a video here to make some alternative catapaults... enjoy!
You will need: sweets (marshmallows or gumdrops/fruit pastels work well), cocktail sticks (garden sticks would do if the ends are pointy enough to work).
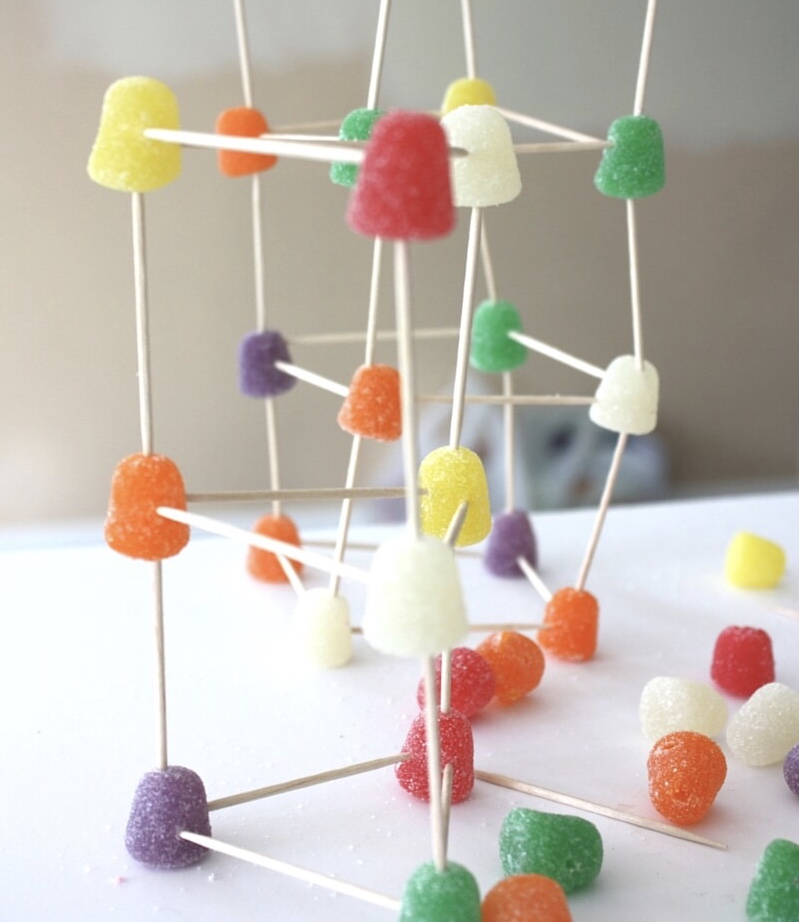
We set a timer and made as many 2d shapes as we could. Then, we put some 3D shapes into the table and tried to make those. Finally, we made anything we wanted. My children made a bridge for their animal figures and a very complicated 3D shape.
Mostly though, it was a lot of fun (and a great way to eat some sweets afterwards!)
Enjoy!
Inspired by Patrick a Arkham’s book, ‘Wild Child’ there is a free family activity pack for you to download here. A great holiday resource, enjoy!
This is a great little experiment! You'll see the sound making the grains of rice move and jump so much! You will need: A big bowl, cling film, uncooked grains of rice (or rainbow sprinkles), a metal pan and a metal spoon.
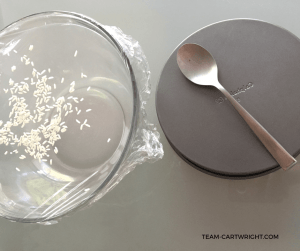
Pull the cling film tightly over the bowl. (One piece, as tight as you can get it, without it breaking.) Put about 1 teaspoon of rice (or sprinkles) on the plastic. Hold the metal pan close to the bowl (without touching) and have your child hit it with the spoon - the harder they hit it the better. The rice will dance!
What is happening?
The pan vibrates, creating a sound wave. This wave is transmitted through the air and causes the plastic wrap to start vibrating as well, making the rice dance! You are seeing the result of the sound waves in the rice.
Are any patterns formed? Try hitting the pan harder and then more gently. How does the behavior of the rice change? See if your child can hit the pan hard enough to bounce the rice right off the plastic! Enjoy!
You will need: 5 glass jars (or glasses/cups) that are the same shape and size, some water for pouring, a spoon/fork, a ruler. It is sometimes helpful to add a little food colouring too, but this is not essential.
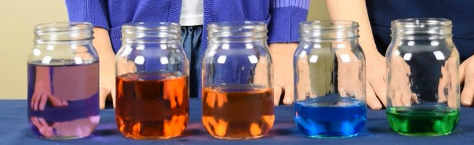
Line the jars up and gently tap each one with the metal spoon/fork. They should make roughly the same sound. Now, fill the first cup with about 1 inch of water, the next cup with 3 inches of water, the third with 5 inches of water and so on. Its a good way to practise measuring with a ruler for your child. If you have food colouring, you may want to add it into the water now (this helps you to see the level of the water in the jar more clearly).
Now, tap the jars again. Do they make the same sound or different? Can your child explain why? Once you've read the info below, see if you can play a tune! We always try 'three blind mice'.
Here is the answer: Sound travels as a wave. In this experiment, tapping on the jars with the spoon causes the jar to vibrate. The vibrations in the jar are transferred to the air surrounding the jar, creating a sound wave. When the jars are all empty, the vibrations and the sounds are all the same. Adding different amounts of water to the jars causes the vibrations (and sound) to change.
Pitch is how high or low sound is. When you add more water to the glass, the pitch is low. This is because large amount of water in the glass makes it more difficult for the glass particles to vibrate, so the vibrations of the glass are slower and they have a lower frequency. When you add less water to the glass, the pitch is high. This is because the low volume of water in the glass allows the glass particle to vibrate more easily, so the vibrations of the glass are faster and have a higher frequency.
Hello! We hope you had a lovely Easter weekend! Now the 'holiday' is over we are back to the regular lockdown routine. So back to our daily posts! We are receiving some lovely photographs of everyone taking part in our activities, thank you! We have posted some here. Please do continue to send them in!
Now to todays activity: A sound map!
You will need: a pencil, a piece of paper, something to lean on. If you want to colour it in, you might want some colouring pencils.
Draw a sound map in an outdoor space. Sounds simple, doesn't it. You pick the best time of day for things to be relatively quiet, set a timer for 5 or 10 minutes and sit in your outside space (or inside with the windows open) with your listening ears on. Then simply draw a picture of any of the sounds you hear. You can do this however you would like. In a map, as a collection of images etc.
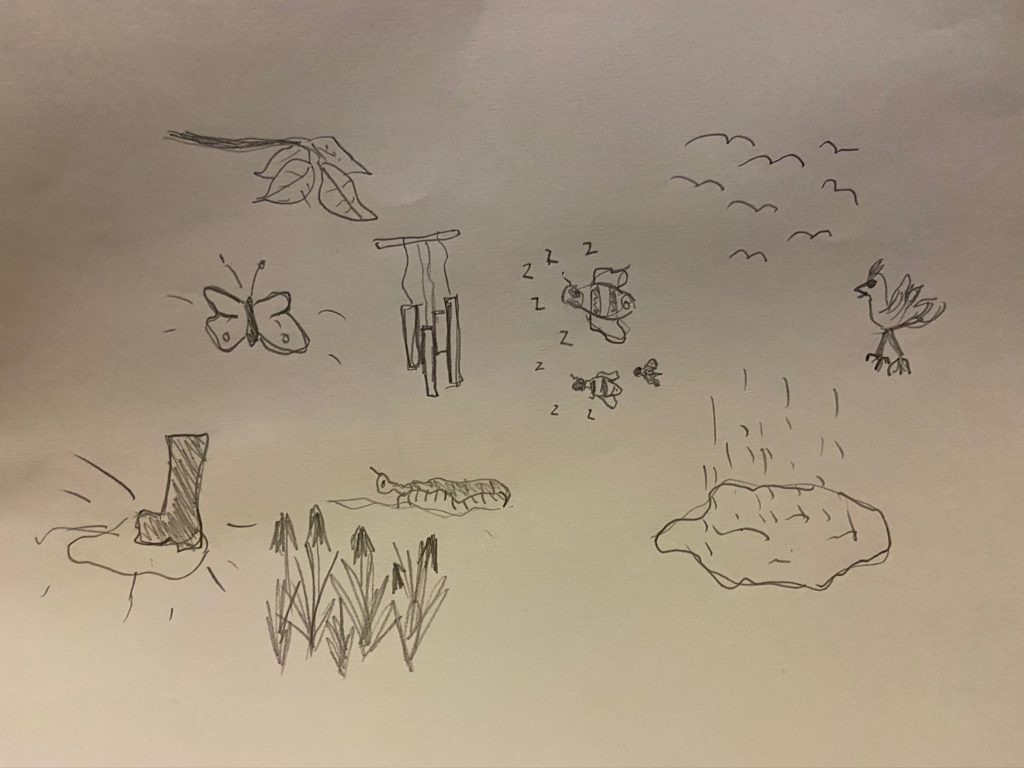
Listen carefully, what do you hear. We heard different types of birds (Blackbirds, crows, seagulls, blue tits), children playing, the wind rustling leaves, a water fountain, something running through the grass (we imagined a tiger but it may have been a cat)...
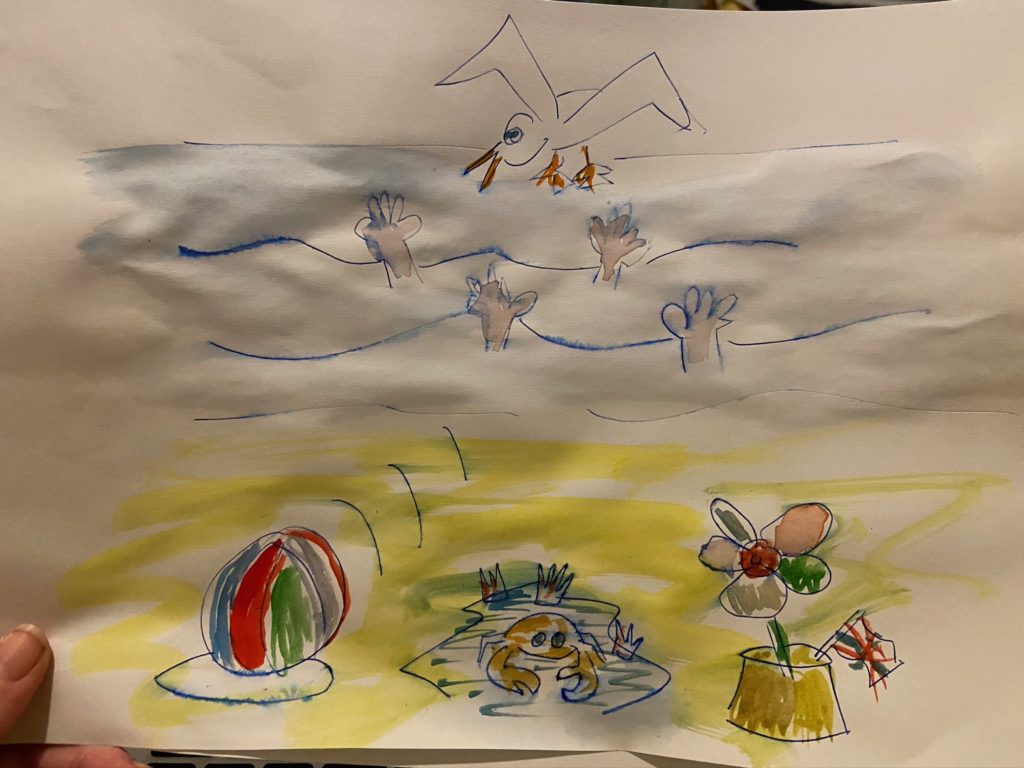
If you visit somewhere else, during your daily walk, you might wish to complete a sound map there too and then compare the pictures once you are home. We sat by the beach for 5 minutes and dre sounds from there (seagulls, oyster catchers, curlews, crabs walking over the stones, waves on the shore, ropes clinking against boat masts, dog barking) another day/in the afternoon and see if the sounds are different.
My children really enjoyed listening for the sounds and drawing them, the 4 year old just as much as our 10 and 11 year old friends when they trailed it (and the grandparents!). And they were so proud of their work, they took great care colouring them in later too. Let us know what you hear!
This week we are going to do a bit of a sound focus. For today, that means making panpipes. You will need: 7 drinking straws (as wide as possible), scissors, a ruler, some tape.
Take 7 straws. Leave the first straw full length. Use the ruler to measure 2 cm on the next straw and cut it there. Pop the cut piece to one side to use later, and then move to the next straw. Measure 4 cm from the end of the third and then cut there, and continue in 2 cm increases until all the straws are cut. Arrange the straws in a line, using the cut pieces as spacers.
Wrap a length of tape around the straws and spacers to hold them in place. You might want to pop a lolly stick along the tape and tape a second time if you have a younger child (it makes them easier to hold!).
Lift the panpipes to your lips and blow the longest straw. Can you make a sound? What sound does it make? Now try the others - what do you notice?
Very simple but rather fun for a friday. Through out the holidays, every friday we will post up a mini science activity for your children to enjoy!
You will need: some cups (you can use empty food tins if you want but be careful of sharp edges!), a sharp pencil or pen (or something to make a hole in the tins), some string, scissors.
Take a cup, and put the pencil through the bottom in the middle to make a hole. Then repeat wth the second cup. Thread the end of the string through the hole in cup 1 and tie a chunky knot. You want to tie it so that the know is inside the cup. measure out the string so you have it long enough (we made it 4 metres long but you can do it however works for you/your space). Then repeat the low tying process (thread the string through the cup and tie a knot inside the cup, in the bottom).
Now play! We had looked up some jokes to tell and whispered them into the cups.. "What is grey and wibble wobbles, wibble wobbles?" "I don't know" "A jellyphant!"
"what do you call a dinosaur that is sleeping?" "I don't know." "A dint-snore!" etc!
The sound waves travel down the string so you can hear! My children were AMAZED it worked and had a lot of fun with it all day. Enjoy!
A lovely little activity for a walk. You can do this anywhere - on the beach on the sand using seaweed, stones and shells, in a forest on the floor using flowers, twigs and leaves, on a salt marsh using flowers, plants and shells... as well as somewhere near thistles! Its a lot of fun!
Very simple: gather some flowers, leaves, etc to make a face. Find a thistle (or clear a spot on the ground). Carefully place the objects on/down to make a face. Recreate to show emotions, or to see who can make the funniest face!
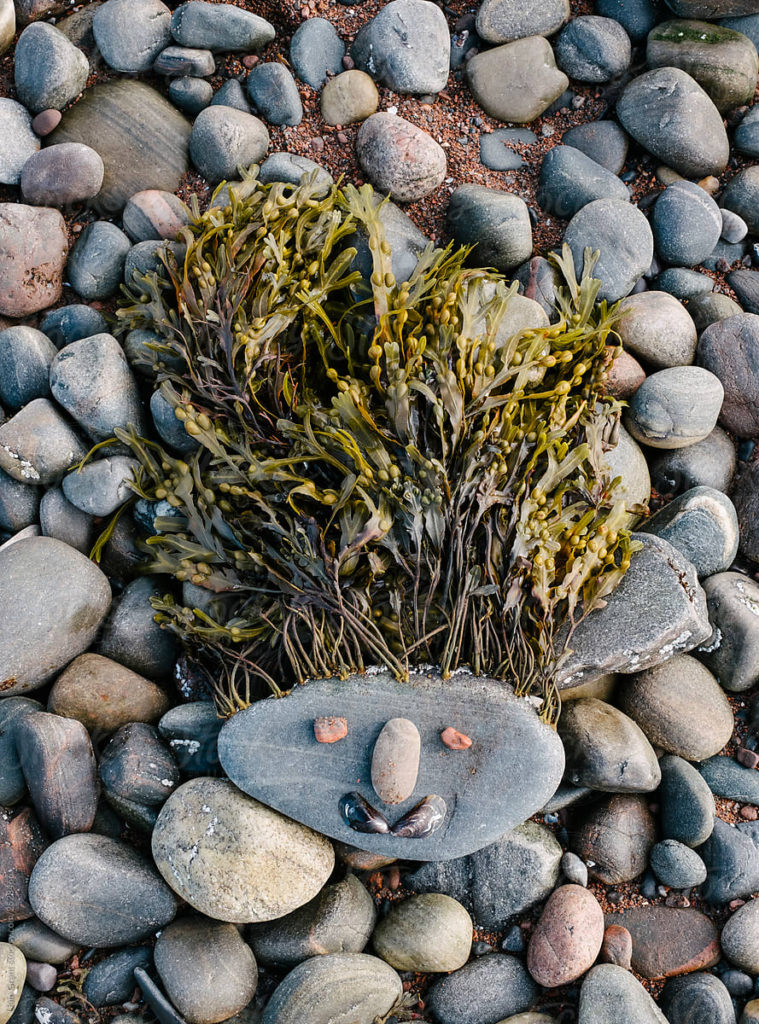

Enjoy!
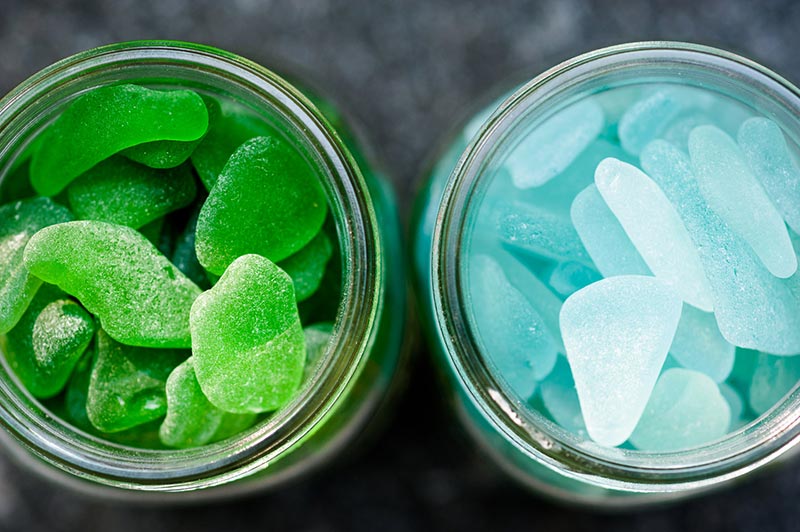
You will need: some beach treasure (pretty/special stones, sea glass, shells) and a glass jar
or
some bendy wire (we used some from an old plug wire that had broken, but you can buy some too - soldering wire works well - or you can buy some pre bent wire for stone necklace pendants) - although you can use good glue instead, some string/ribbon. A hammer makes this rather fun too, but is not essential!
Head to the beach! Collect your exciting finds. We always look for sea glass (mermaid treasure in this house!), as well as stones that are pretty with patterns, shells we decided are special and anything else we decide is 'beach treasure'.
You can make a seaside treasure display - we put all the sea glass in jars and leave them on the window sill. They look very pretty when the sun shines behind them. Once you have enough, you can even split them into colour groups.
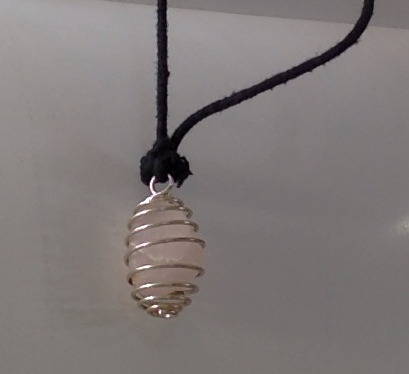
You can also make beach treasure jewellery. To do this, you select the item you want to make into jewellery. Then cut a strip of the wire. Lay it flat and bash it with a hammer (so that it is flat). starting at the top of your sea treasure, wrap it around in a spiral shape, making sure it gets smaller at the bottom (so the stone/shell doesn't fall out). Then pull the end back up to the top and bend it into a hoop. Tie some string or ribbon around, and then you have a necklace or bracelet with your favourite stone/shell find. They make great presents too!
Enjoy!
You will need: a jar, some boiling water, string, a spoon, salt, patience!
Stir salt into boiling hot water until no more salt will dissolve (crystals start to appear at the bottom of the container). Be sure the water is as close to boiling as possible. Carefully pour the solution into your jar. (putting a spoon into the jar before adding the water should prevent the jar breaking. Suspend your string into the jar from the spoon laid across the top of the jar. Leave your jar somewhere it will not be disturbed and wait for your crystal to grow!
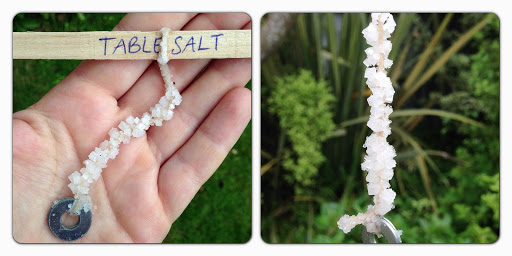
Once your crystals have grown, you can look for some interesting things in them:
- Any impurities in the salt or the water will change the shape and colour of the crystals you grow. What shape and colour are yours?
- Try using different types of table salt – try iodized salt, un-iodized salt, sea salt, or even salt substitutes. Is any difference in the appearance of the crystals?
- Try using different types of water, such as tap water compared with distilled water. Is there any difference in the appearance of the crystals?
Good morning! Today is the big butterfly count! It's a great little activity and you and your child(ren) will be taking part in a wonderful citizen science project. You need to download the spotting chart or get the free app and then sit somewhere for 15 minutes and record all the butterflies you see. If you live near a salt marsh, its lovely to do a comparison between the ones you spot in a garden or wild space and the ones you see down on the marshes.
Some butterfly facts for you (and some information about why this is important!):
The UK has 59 species of butterflies – 57 resident species of butterflies and two regular migrants – the Painted Lady and Clouded Yellow.
Five species of butterfly have become extinct in the last 150 years. These are the Mazarine Blue, Large Tortoiseshell, Black-veined White, Large Copper and Large Blue. (Large Blue was successfully reintroduced in 1992)
The State of the UK’s Butterflies 2015 report found that 76% of the UK’s resident and regular migrant butterflies declined in abundance, occurrence or both over the last four decades.
The Bumblebee Conservation Trust have been working on a way to help you identify bumble bees. Its a nice activity in a woodland or in your garden... we were really surprised at how many different types you can spot!
You can work through the online quiz to identify a bumblebee here.
You can use the spotter guide to identify a bumblebee here.
There are some top tips to help you here.
Good luck! We hope you find as many as we did!